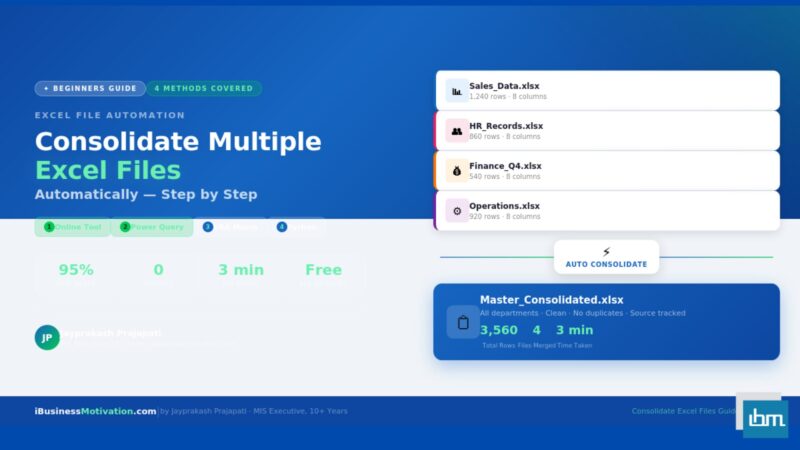


If you work in any organisation that runs on Excel, you have almost certainly faced this situation: five departments email you their weekly data files every Friday. Your job is to merge all five files into one master report before Monday morning. You open each file, copy the data, paste it into a master sheet, clean up the formatting inconsistencies, and repeat. It takes two to three hours – and you do it every single week.
This process has a name: Excel file consolidation. And there is a far better way to do it. In this complete guide, you will learn four proven methods to consolidate multiple Excel files automatically – from no-code browser tools to Power Query, VBA Macros, and Python. Each method is explained step by step so that even a complete beginner can follow along and implement it today.
By the end of this guide, what used to take you three hours on a Monday morning will take under five minutes – and it will be more accurate than anything you could do manually.
Section 1: Why Manual Excel File Consolidation Fails
Before diving into the solutions, it is worth understanding exactly why the manual copy-paste method is not just slow – it is fundamentally broken as a process.
When you manually merge Excel files, you introduce risk at every step. A misaligned paste adds blank rows. A forgotten file creates an incomplete master. Different departments use different column orders, date formats, or number styles – and when you merge them manually, those inconsistencies carry forward invisibly into your reports.
| Manual Method Problem | How Often It Happens | Business Impact |
| Duplicate rows from double-paste | 75% of weekly merges | Inflated totals in reports |
| Missing rows (file forgotten) | 30% of monthly merges | Incomplete regional data |
| Column misalignment between files | 100% of the time | Silent data corruption |
| Formatting inconsistencies | Every single merge | Extra cleaning time every week |
| Wrong data sent to wrong region | 50% of split operations | Decisions made on bad data |
| Process depends on one person | Always | Entire workflow stops if they are absent |
The root cause of all these problems is the same: the process puts human attention in the critical path. Every time a human touches the data, there is a chance for error. Automation removes humans from the repetitive parts of the process – and eliminates the entire category of manual errors along with them.
Section 2: The 4 Methods to Consolidate Excel Files Automatically
There are four main approaches to consolidating multiple Excel files automatically. Each has its own strengths, limitations, and ideal use cases. Here is a quick overview before we dive into each one:
| Method | Technical Skill Needed | Best For | Speed | Cost |
| Method 1: Online File Merger Tool | Zero – no skills needed | Beginners, quick merges | Under 3 minutes | Free |
| Method 2: Excel Power Query | Beginner – clicks only | Recurring merges, folder of files | Under 5 minutes (once set up) | Free (built into Excel) |
| Method 3: VBA Macro | Intermediate – some coding | Automated scheduled merges | Under 2 minutes per run | Free (built into Excel) |
| Method 4: Python (pandas) | Advanced – coding required | Large files, complex logic | Seconds for any file count | Free (open source) |
Which Method Should You Start With?
If you are a complete beginner, start with Method 1. It requires zero technical knowledge and works immediately. If you use Excel regularly and want a reusable, automated solution, Method 2 (Power Query) is the best investment of your time. Methods 3 and 4 are for users who want full control and maximum automation.
Method 1: Online Excel File Merger Tool (Zero Technical Skill Required)
The fastest way to consolidate multiple Excel files is to use a browser-based online tool that handles the entire merge process for you – no installation, no formulas, no code. You upload your files, click merge, and download one clean consolidated file.
This is the method used by thousands of HR managers, accountants, and operations heads who need to merge Excel files regularly without any technical knowledge.
Step-by-Step: How to Use the Multiple Excel File Merger Tool
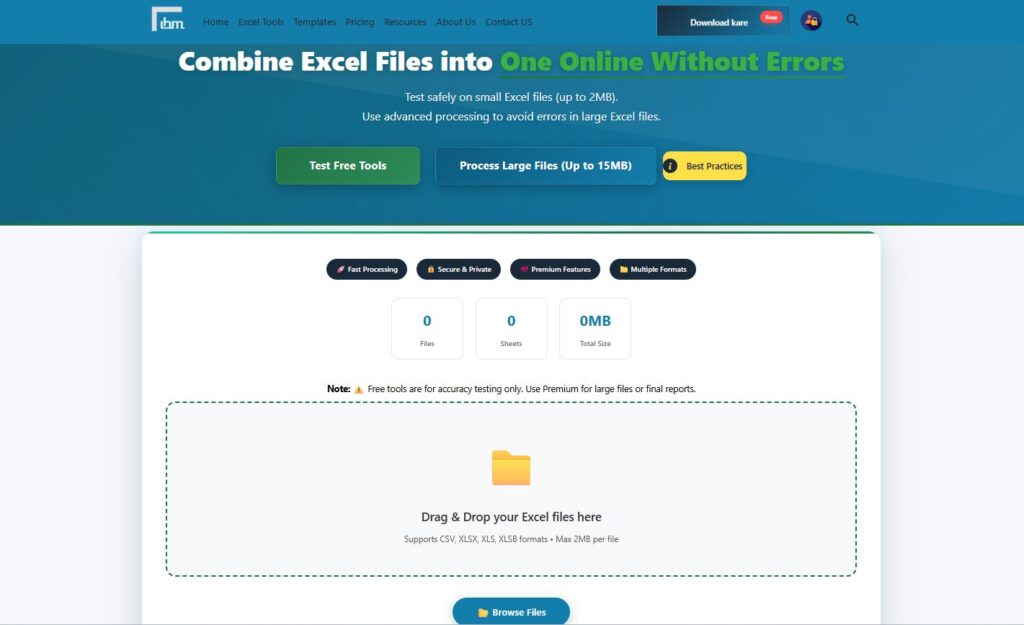
- Open your browser and go to the Multiple Excel File Merger at ibusinessmotivation.com/multiple-excel-file-merger-free/
- Click the Upload Files button and select all the Excel files you want to consolidate. You can select multiple files at once by holding Ctrl while clicking.
- Review the file list shown on screen. All uploaded files will be listed with their sheet names.
- Choose your merge options: stack all data vertically (most common), or merge side by side.
- Check the option to include or exclude header rows from subsequent files to avoid duplicate headers in the output.
- Click the Merge Files button. The tool processes all files and combines them into one master sheet.
- Download the consolidated output file. It is ready to use immediately – no additional cleaning required.
| Feature | Detail |
| File formats supported | XLSX, XLS, CSV |
| Maximum files per merge | Unlimited (free tier: up to 2MB per file) |
| Duplicate header handling | Automatic – keeps first header only |
| Data stacking direction | Vertical (rows) or Horizontal (columns) |
| Output format | Single .xlsx file |
| Software installation required | No – works in any browser |
| Works on mobile | Yes |
| Average time for 5 files | Under 3 minutes |
Real Result from This Method: Using the browser-based merger reduced a 75-minute manual file merge to under 3 minutes, with zero duplicate rows and zero formatting errors. The same result was achieved every week without any variation.
When to Use Method 1: Use this method when you need a quick one-time or occasional merge and do not want to set up any technical solution. It is ideal for users who are not comfortable with Excel features like Power Query or for sharing with non-technical team members who need to run the merge themselves.
Method 2: Excel Power Query – Consolidate an Entire Folder of Files Automatically
Power Query is the most powerful built-in Excel tool for consolidating data – and it is available for free in Excel 2016 and all later versions. Its biggest advantage is that once you set it up, it updates automatically every time new files are added to the folder. You click Refresh and the consolidation is done in seconds.
Power Query does not require any coding. Everything is done through a visual interface with clicks and menus.
Prerequisites
- Excel 2016, Excel 2019, Excel 2021, or Microsoft 365
- All Excel files to be merged must be saved in the same folder
- All files must have the same column structure (same column names and order)
Step-by-Step: Consolidate a Folder of Excel Files with Power Query
Step 1: Organise Your Files
Create a dedicated folder on your computer – for example, C:\WeeklyReports\. Move all the Excel files you want to consolidate into this folder. Do not put any other files in this folder, as Power Query will try to process every file it finds there.
Step 2: Connect Power Query to the Folder
- Open a new, blank Excel workbook.
- Click the Data tab in the Excel ribbon.
- Click Get Data, then From File, then From Folder.
- Browse to your folder (e.g., C:\WeeklyReports\) and click OK.
- A preview window appears showing all files in the folder. Click Combine, then Combine and Transform Data.
Step 3: Configure the Combination Settings
- A dialog box appears asking you to specify the structure of the files. Excel will show a preview of the first file.
- In the Sample File dropdown, select the first file in your list.
- In the sheet selector below, choose the sheet that contains your data (usually Sheet1).
- Click OK. Power Query will now combine all files in the folder.
Step 4: Clean the Combined Data in Power Query Editor
The Power Query Editor opens with all files combined into one table. At this stage you may notice some columns you do not need, such as the Source.Name column which shows the filename each row came from. Here is what to clean:
- Right-click the Source.Name column and select Remove Column if you do not need it.
- Check the first row. If it has become a header row (from the first file), it is already handled. If you see duplicate header rows in the data, click the Home tab and select Remove Rows, then Remove Duplicates.
- Verify that column data types are correct. Click the data type icon at the top of each column to change it if needed.
Step 5: Load the Data to Excel
- Click Close and Load in the top-left of the Power Query Editor.
- Your consolidated data appears in a new sheet inside your workbook as a formatted Excel table.
- Save the workbook as an .xlsx file in a location outside your reports folder.
Step 6: Refresh the Consolidation When New Files Arrive
This is where Power Query becomes truly powerful. When a new file is added to your folder next week, you do not need to repeat any of the above steps. Simply:
- Open the workbook.
- Right-click anywhere in the consolidated table.
- Click Refresh. Power Query will automatically pick up the new file and add its data to the master table.
Power Query Advantage: Once set up, a folder containing 20 department files consolidates in under 8 seconds on a standard office computer. Adding a new weekly file and refreshing takes under 30 seconds total.
Common Power Query Issue: Mixed Data Types: If one file has a date formatted as text and another has it as an actual date, Power Query may flag a type error. Fix this by clicking the column header, selecting Change Type, and choosing the correct type. Apply it to all files by clicking Replace Current at the prompt.
When to Use Method 2: Use Power Query whenever you have a recurring consolidation task – weekly reports, monthly department data, or any situation where new files are regularly added to the same folder. The one-time setup time is about 15 minutes. After that, every future consolidation takes under 30 seconds
Method 3: VBA Macro – Automate File Consolidation with a Single Button Click
If you want full control over the consolidation process – including custom column handling, filtering, transformation, and automatic file saving – a VBA Macro is the right tool. The macro below consolidates all Excel files from a folder into a master sheet and adds a source filename column so you always know where each row came from.
How to Set Up and Run the VBA Consolidation Macro
- Open a new blank Excel workbook.
- Press Alt + F11 to open the VBA Editor.
- Go to Insert, then click Module.
- Copy and paste the complete macro code below into the blank module.
- Press F5 to run, or close the editor and assign the macro to a button on your sheet.
Sub ConsolidateExcelFiles()
    ' ---------------------------------------------------------
    ' Consolidates all .xlsx files from a selected folder
    ' into a single master sheet with source file tracking
    ' ibusinessmotivation.com | Jayprakash Prajapati
    ' ---------------------------------------------------------

    Dim folderPath  As String
    Dim fileName    As String
    Dim masterWb    As Workbook
    Dim masterWs    As Worksheet
    Dim sourceWb    As Workbook
    Dim sourceWs    As Worksheet
    Dim lastRow     As Long
    Dim masterRow   As Long
    Dim isFirstFile As Boolean

    ' --- Let user choose the folder ---
    With Application.FileDialog(msoFileDialogFolderPicker)
        .Title = "Select folder containing Excel files"
        .AllowMultiSelect = False
        If .Show = False Then
            MsgBox "No folder selected. Macro cancelled.", vbExclamation
            Exit Sub
        End If
        folderPath = .SelectedItems(1) & "\"
    End With

    ' --- Set up master workbook and sheet ---
    Set masterWb = ThisWorkbook
    On Error Resume Next
    Application.DisplayAlerts = False
    masterWb.Sheets("Master_Data").Delete
    Application.DisplayAlerts = True
    On Error GoTo 0
    Set masterWs = masterWb.Sheets.Add(After:=masterWb.Sheets(masterWb.Sheets.Count))
    masterWs.Name = "Master_Data"

    masterRow = 1
    isFirstFile = True
    Application.ScreenUpdating = False
    Application.Calculation = xlCalculationManual

    ' --- Loop through every .xlsx file in the folder ---
    fileName = Dir(folderPath & "*.xlsx")
    Do While fileName <> ""
        Set sourceWb = Workbooks.Open(folderPath & fileName, ReadOnly:=True)
        Set sourceWs = sourceWb.Sheets(1)   ' Use first sheet of each file
        lastRow = sourceWs.Cells(sourceWs.Rows.Count, 1).End(xlUp).Row

        If isFirstFile Then
            ' Copy header row from first file only
            sourceWs.Rows(1).Copy masterWs.Rows(1)
            ' Add Source File column header
            masterWs.Cells(1, sourceWs.UsedRange.Columns.Count + 1).Value = "Source_File"
            masterRow = 2
            isFirstFile = False
        End If

        ' Copy data rows (skip header - start from row 2)',
        If lastRow >= 2 Then
            sourceWs.Rows("2:" & lastRow).Copy masterWs.Rows(masterRow)
            ' Write source file name for each copied row
            Dim i As Long
            For i = masterRow To masterRow + lastRow - 2
                masterWs.Cells(i, sourceWs.UsedRange.Columns.Count + 1).Value = fileName
            Next i
            masterRow = masterRow + lastRow - 1
        End If

        sourceWb.Close False   ' Close without saving
        fileName = Dir()       ' Move to next file
    Loop

    ' --- Final formatting ---
    masterWs.Columns.AutoFit
    masterWs.Rows(1).Font.Bold = True
    masterWs.Rows(1).Interior.Color = RGB(31, 78, 121)
    masterWs.Rows(1).Font.Color = RGB(255, 255, 255)

    ' --- Restore Excel settings ---
    Application.ScreenUpdating = True
    Application.Calculation = xlCalculationAutomatic

    MsgBox "Consolidation complete!" & vbNewLine & _
           "Total data rows merged: " & (masterRow - 2) & vbNewLine & _
           "Output sheet: Master_Data", vbInformation
End Sub
What This Macro Does – Line by Line
| Macro Section | What It Does |
| FileDialog picker | Opens a folder browser so the user can choose which folder to consolidate |
| Delete and recreate Master_Data sheet | Ensures a fresh blank sheet every time the macro runs |
| Dir() loop | Finds and processes every .xlsx file in the selected folder automatically |
| isFirstFile logic | Copies the header row only once from the first file, skips headers in all subsequent files |
| Source_File column | Adds the source filename to every row so you always know which file each row came from |
| ScreenUpdating = False | Prevents screen flashing and speeds up the macro significantly |
| Final formatting | Auto-fits columns and formats the header row professionally |
When to Use Method 3: Use VBA when you want a fully automated, button-click solution that lives inside your Excel workbook. VBA is also the right choice when you need custom logic – for example, only consolidating files that match a specific date pattern, or filtering rows during the merge.
Method 4: Python with pandas – The Most Powerful Consolidation Method
For users who work with very large files, need to schedule consolidation automatically, or want to apply complex transformations during the merge, Python with the pandas library is the most powerful option. A Python script can merge 50 Excel files in under 10 seconds, and it can be scheduled to run automatically every day without any human involvement.
Prerequisites
- Python 3.8 or later installed (free from python.org)
- pandas and openpyxl libraries installed
Install the Required Libraries
pip install pandas openpyxlComplete Python Script: Consolidate All Excel Files in a Folder
import pandas as pd
import os
from pathlib import Path
from datetime import datetime

# ── Configuration ────────────────────────────────────────────
FOLDER_PATH   = r"C:\WeeklyReports"     # Folder with Excel files
OUTPUT_FILE   = r"C:\WeeklyReports\Master_Consolidated.xlsx"
ADD_SOURCE_COL = True                    # Track which file each row came from
SHEET_INDEX    = 0                       # Use first sheet (0 = first)
# ─────────────────────────────────────────────────────────────

def consolidate_excel_files(folder_path, output_file):
    folder = Path(folder_path)
    excel_files = list(folder.glob("*.xlsx")) + list(folder.glob("*.xls"))

    if not excel_files:
        print("No Excel files found in the specified folder.")
        return

    print(f"Found {len(excel_files)} Excel files. Starting consolidation...")
    all_dataframes = []

    for file in excel_files:
        try:
            df = pd.read_excel(file, sheet_name=SHEET_INDEX)
            if ADD_SOURCE_COL:
                df["Source_File"] = file.name
            all_dataframes.append(df)
            print(f"  Loaded: {file.name} - {len(df)} rows")
        except Exception as e:
            print(f"  ERROR reading {file.name}: {e}")

    if not all_dataframes:
        print("No data loaded. Check your files and try again.")
        return

    master_df = pd.concat(all_dataframes, ignore_index=True)

    # Optional: Remove fully duplicate rows
    before = len(master_df)
    master_df.drop_duplicates(inplace=True)
    after = len(master_df)
    print(f"Removed {before - after} duplicate rows.")

    master_df.to_excel(output_file, index=False, engine="openpyxl")
    print(f"\nConsolidation complete!")
    print(f"Total rows in master file: {len(master_df)}")
    print(f"Output saved to: {output_file}")

# Run the consolidation
consolidate_excel_files(FOLDER_PATH, OUTPUT_FILE)| Python Script Feature | Benefit |
| Handles .xlsx and .xls both | Works with any Excel file format automatically |
| Source_File column | Full traceability – know exactly where every row came from |
| Automatic duplicate removal | Removes fully duplicate rows with one line of code |
| Error handling per file | One bad file does not stop the entire consolidation |
| Runs from command line | Can be scheduled via Windows Task Scheduler or cron job |
| No Excel needed to run | Runs on any computer – even without Excel installed |
| Scales to any file size | Can consolidate 500 files with 100,000 rows each |
When to Use Method 4: Use Python when you are working with large volumes of data, need to schedule the consolidation automatically, or want to apply data transformations (cleaning, filtering, reformatting) as part of the merge process. Python is also the best choice for non-Windows environments.
Section 3: Full Comparison of All 4 Methods
Now that you understand all four methods, here is a comprehensive side-by-side comparison to help you pick the right one for your situation:
| Criteria | Method 1: Online Tool | Method 2: Power Query | Method 3: VBA Macro | Method 4: Python |
| Technical skill needed | None | Beginner | Intermediate | Advanced |
| Setup time | 0 minutes | 15 minutes | 20 minutes | 30 minutes |
| Time per consolidation | 2–3 minutes | 30 seconds (after setup) | Under 2 minutes | Under 10 seconds |
| Works without Excel | Yes (browser) | No | No | Yes |
| Handles duplicate headers | Yes (automatic) | Yes (automatic) | Yes (in code) | Yes (in code) |
| Tracks source file | No | Yes (Source.Name column) | Yes (built into macro) | Yes (built into script) |
| Auto-refresh on new files | No (re-upload needed) | Yes (one click Refresh) | Yes (re-run macro) | Yes (re-run script) |
| Can filter during merge | No | Yes (Power Query editor) | Yes (IF statements) | Yes (pandas queries) |
| Can schedule automatically | No | No | Partially (with Task Scheduler) | Yes (fully automated) |
| Best for file count | 2–10 files | Any number | Any number | Any number (1000+) |
| Cost | Free | Free | Free | Free |
Section 4: Real-World Use Cases – Who Uses Excel File Consolidation and How
Excel file consolidation is not limited to one type of job or industry. Here are the most common real-world scenarios where professionals use these methods every week:
| Job Role | Their Weekly Problem | Best Method |
| MIS Executive | Merging sales, HR, finance, ops, and logistics files into one weekly master report | Method 2 (Power Query) or Method 3 (VBA) |
| HR Manager | Consolidating attendance and payroll sheets from 8 branch offices | Method 1 (Online Tool) or Method 2 (Power Query) |
| Sales Analyst | Combining territory-wise sales reports from 12 regional managers | Method 2 (Power Query) – refreshes weekly automatically |
| Accountant | Merging expense sheets from multiple departments for monthly P&L | Method 1 or Method 2 depending on file count |
| Operations Head | Consolidating inventory files from 5 warehouses into one stock master | Method 3 (VBA) for custom logic per warehouse |
| Data Analyst | Merging 3 years of monthly files (36 files) for annual trend analysis | Method 4 (Python) – fastest for large file counts |
| Freelance Consultant | Combining client-provided data files before analysis and reporting | Method 1 (Online Tool) – no setup, works instantly |
| Supply Chain Manager | Daily consolidation of purchase orders from multiple vendors | Method 4 (Python) – scheduled to run automatically at 6 AM |
Section 5: Common Errors During Excel File Consolidation and How to Fix Them
No matter which method you use, certain errors appear frequently. Here are the most common consolidation problems and their solutions:
| Error / Problem | Root Cause | How to Fix It |
| Duplicate header rows in output | Header rows from each file are being copied along with the data | Use the isFirstFile flag (VBA), or remove duplicates in Power Query. Online tool handles this automatically. |
| Column count mismatch | Different files have different columns or column orders | Standardise all source files to the same column template before merging. Use a template file. |
| Blank rows between merged data | Source files have blank rows at the bottom | Remove trailing blank rows from source files, or use lastRow detection code in VBA. |
| Date values showing as numbers | Date column type not consistently set across files | In Power Query: set the column type to Date. In Python: use parse_dates=[‘ColumnName’] in read_excel. |
| File locked or cannot be opened | Source file is already open in Excel while the macro runs | Close all source files before running the VBA macro. |
| Power Query shows wrong data | New files added to folder have different structure | Open Power Query editor, review errors, and fix column mapping. |
| Python FileNotFoundError | Folder path uses backslashes without the r prefix | Always use r”C:\FolderPath” or forward slashes C:/FolderPath in Python. |
| Numbers stored as text | Source files exported from other systems use text formatting for numbers | In Power Query: change the column type. In Python: use pd.to_numeric(errors=’coerce’). |
Critical Warning: Never Merge Files With Mismatched Columns Without Checking First
If your source files have different column names or different column orders, any automated consolidation method will produce incorrect data silently – no error will appear. Always verify that all source files follow the same column template before running any consolidation.
Section 6: Before and After – The Real Numbers
Here is a real comparison of manual vs automated consolidation, based on a weekly MIS reporting workflow across 5 departments:
| Metric | Before (Manual) | After (Automated) |
| Total time per week | 180–240 minutes | 3–8 minutes |
| Time saved per month (4 weeks) | – | 700–940 minutes (12–16 hours) |
| Duplicate row errors per month | 5–7 occurrences | 0 occurrences |
| Wrong data in reports per month | 3–4 occurrences | 0 occurrences |
| Can non-technical staff run it? | Yes, but error-prone | Yes, error-free (Method 1 or 2) |
| Works if primary person is absent? | No | Yes |
| Audit trail (which file, which row?) | None | Full (Source_File column) |
| Scalable to more departments? | Gets harder | Scales with zero added effort |
Section 7: 10 Pro Tips for Faster, Error-Free Excel File Consolidation
- Standardise your source file template. Create a locked Excel template with fixed column names and order. Distribute it to all departments. This eliminates column mismatch errors permanently.
- Name your files consistently. Use a pattern like YYYY-MM-DD_Department_Data.xlsx. Consistent naming makes it easier to sort, filter, and identify files in any method.
- Always keep a backup of source files before consolidating. Automated methods do not modify source files, but manual mistakes can. Keep originals in a separate archive folder.
- Add a Source_File column in every method. Knowing which file each row came from is invaluable for auditing, debugging, and answering questions from regional managers.
- In Power Query, always use the folder approach rather than connecting to individual files. Connecting to a folder makes refresh automatic when new files arrive.
- For VBA, add Application.ScreenUpdating = False and Application.Calculation = xlCalculationManual at the start. These two lines alone make most consolidation macros run 5 to 10 times faster.
- In Python, always handle exceptions per file using try/except. A single corrupt or mis-formatted file should not stop the entire consolidation – log the error and continue with the remaining files.
- After consolidation, always run a row count check. Compare the total rows in the master file against the sum of rows in the individual source files. Any discrepancy means data was missed or duplicated.
- Use the Excel Data Cleaner tool after consolidation to remove residual blank rows, fix formatting inconsistencies, and eliminate any duplicates that passed through the merge. Available free at ibusinessmotivation.com.
- Document your consolidation process with a simple README file. Write down: which folder, which method, which workbook to open, which button to click. This ensures any team member can run it when you are unavailable.
Frequently Asked Questions
In practice, the terms are used interchangeably. Technically, consolidation usually means combining data from multiple files into one master dataset – stacking rows from each file. Merging can also refer to combining columns side-by-side (like a database JOIN). This guide focuses on the most common use case: stacking rows from multiple files into one master file.
Yes. Both Power Query and the VBA macro can be modified to target a specific sheet by name or index across all files. In Power Query, you can select which sheet to use during the combination setup. In VBA, change Sheets(1) to Sheets(“SheetName”) to specify the sheet by name. The Python script uses sheet_name parameter in read_excel.
This is the most common real-world challenge. Power Query handles it best: after combining, you can reorder, rename, and remove columns visually. In Python, use pandas reindex to specify the exact column order you want in the output. The safest long-term fix is to standardize the column template across all source files.
Yes, but you will need to handle the extra columns in the Power Query editor. Columns present in some files but not others will be filled with null values for files where they are absent. Review the schema after combining and decide whether to keep or remove those columns.
Yes. Power Query handles CSV files natively – use Get Data, From File, From Folder and it will detect both XLSX and CSV files. The Python script can be modified to include CSV files by adding list(folder.glob(‘*.csv’)) to the file list. The online tool at ibusinessmotivation.com also accepts CSV files.
There is no hard limit in any of the methods. Power Query and VBA are limited by Excel’s maximum row limit of 1,048,576 rows per sheet. If your consolidated data exceeds this, use Python – it has no row limit and can write to multiple output sheets or a database instead of a single Excel file.
In Power Query: use the Remove Duplicates option on the relevant column. In VBA: use Excel’s built-in Remove Duplicates method on the master range. In Python: use df.drop_duplicates(). The online tool at ibusinessmotivation.com includes an Excel Data Cleaner that removes duplicates from the consolidated output as a separate step.
Summary: Your Action Plan for This Week
You now have everything you need to stop consolidating Excel files manually and start doing it automatically. Here is a clear, immediate action plan based on your situation:
| Your Situation | Recommended First Step |
| Complete beginner, need to merge files today | Use Method 1: ibusinessmotivation.com/multiple-excel-file-merger-free/ |
| Use Excel regularly, want a permanent solution | Set up Method 2 (Power Query) this week – 15 minutes of setup saves hours every month |
| Comfortable with Excel, want a custom macro | Copy the Method 3 VBA macro and test it on a sample folder today |
| Work with large data, want full automation | Install Python and pandas, configure the Method 4 script for your folder |
| Need to clean data after merging | Use the Excel Data Cleaner at ibusinessmotivation.com after consolidation |
The most important thing is to take action today. Even switching from pure manual copy-paste to the browser-based merger tool eliminates hours of effort and eliminates the most common source of reporting errors. Every method in this guide is free. Every method is available right now. Start with the one that fits your skill level and upgrade as you get comfortable.


